
Measurements
DICOM measurements and PDF reports on iPhone and iPad
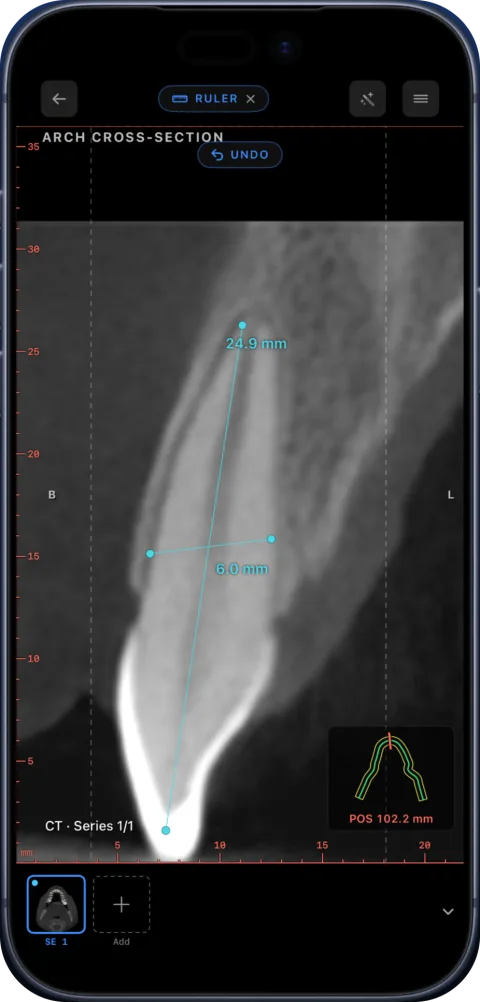
Ossidex measures distances in millimetres, angles and Hounsfield units (ROI statistics and a point probe) on slices, MPR planes and dental cross-sections, using the pixel spacing stored in the DICOM file. Add arrows, text or freehand marks and export the view or a one-page PDF report, with or without patient details.
Tools
| Tool | What it does |
|---|---|
| Ruler | Distance in mm from DICOM pixel spacing; snaps with haptic feedback in MPR and the arch |
| Angle | Angle between two lines |
| ROI | Mean, min, max and standard deviation of HU inside an area |
| HU probe | Value under the cursor; on CBCT with a Misch bone-density reading as a guide |
| Tooth marker | FDI or Universal tooth number label |
| Arrow, line, text, freehand | Annotations for teaching and patient communication |
Labels sit at the end of a measurement and can be dragged away with a leader line. Undo, delete and done are always one tap away.
Exports
- Image of the current view with annotations.
- PDF report — one page with the key image and measurements; the patient name can be switched off in settings.
- Arch report — the panorama plus every cross-section.
- Series as PDF or a ZIP of JPEG images, and cine as MP4.
- Anonymized export of the study for sharing with colleagues.
Exports are free while your library holds up to five studies; after that they are part of Pro.
Accuracy
Distances are computed from the pixel spacing and slice geometry recorded by the scanner. Their accuracy depends on the scan (voxel size, motion, calibration); Ossidex does not add any correction. For CBCT, gray values are not calibrated Hounsfield units, so HU readings there are relative.
Measuring step by step
- Pick the plane. Measure on a 2D slice, on any MPR plane or on a dental cross-section — whichever shows the structure best. Zoom in first for precision.
- Choose a tool. Open the tools menu and pick ruler, angle, ROI or HU probe.
- Place the points. Tap or drag the end points; in MPR and the dental arch the ruler snaps to the plane with a light haptic tick.
- Read and adjust. The value appears at the end of the line. Drag a label away if it covers anatomy; undo or delete in one tap.
- Export. Export the view as an image or a one-page PDF report, or the whole arch as a report with every cross-section.
Typical measurements
| Task | Where | Tool |
|---|---|---|
| Bone height and width at a site (dental) | Arch cross-section | Ruler |
| Root length, canal width (dental) | MPR along the root with a thin slab | Ruler |
| Tissue density | CT slice | ROI or HU probe |
| Angulation of a tooth or fracture line | MPR plane | Angle |
| Size of a structure for follow-up | Slice or MPR | Ruler, saved with the study |
Implant planning and dedicated endodontic tools are not in the app today — they are marked “Soon”. The ruler on cross-sections and MPR covers the measurements above.
Reports that are easy to share
The one-page PDF report puts the key image, the measurements and the study details on one page. It is handy for a referral letter, a patient file or a message to a colleague. Switch the patient name off in settings when the report leaves your practice, or export an anonymized copy of the whole study instead. Reports carry no watermark.
Frequently asked questions
Are measurements saved?
Yes. They stay with the study on the device, and in the dental arch they follow the curve when you edit it.
Can I measure on MRI?
Distances and angles, yes. Hounsfield units exist only for CT; MRI signal values are arbitrary units.
Are measurements free?
Yes, in 2D. Measuring on MPR planes and arch cross-sections is available wherever those Pro modes are.
Can I calibrate a measurement on an X-ray without pixel spacing?
Measurements use the spacing stored in the DICOM file. Images without spacing (for example photos) cannot be measured in millimetres.
Related pages
Dental panoramic arch and cross-sections from any CBCT
Trace the dental arch on a CBCT and get a live panorama with numbered cross-sections, tooth numbering, HU probe and a PDF report — on iPad and iPhone.
Misch bone density D1–D4
The Misch D1–D4 bone density classes, the Hounsfield ranges usually quoted for them, and why CBCT gray values are only relative, not true HU.
Offline, on-device DICOM viewer: your scans never leave the device
Ossidex opens and renders scans on your iPhone or iPad. No account, no upload of images to our servers, offline viewing, anonymized export when you share.
Ossidex pricing: free to view, Pro for MPR, 3D and the arch
Ossidex is free to download with 2D viewing and measurements. Pro is an optional auto-renewing subscription that adds MPR, 3D, the panoramic arch and more.